Have you ever wondered how automatic sprinklers work? How autopilot on a plane works? How cars maintain their speed using cruise control? These robots and systems are run by something called a control system.
Imagine you have a beautiful garden bed with different vegetables. You could use a proportional controller for a sprinkler system to ensure that the plants are getting exactly as much water as they need all year long. It’ll even handle rainy or dry seasons just fine. How?
Proportional control means controlling something in relation to something. In this case, we want to control moisture in the soil in relation to the water needs of our plant. We could even use the exact same controller for two different vegetable plants needing completely different amounts of water by scaling the system up or down.
So control systems sound pretty cool, how does one actually work?
Let’s say we have our garden installed with a sprinkler system. The sprinkler system is our output: the thing we’re controlling is the amount of water the sprinklers put into our soil.
We need an input. The most obvious choice is a moisture sensor in the soil near the roots of the plant. Suppose this sensor tells us exactly how much water is in the soil.
We also have a goal (or target), the outcome we’re trying to achieve. In this case it’s how much water our plant needs.
A proportional controller increases or decreases the output (water from the sprinklers) proportional to how far off the goal we are, how thirsty or drowned our plants are at any given time, based on the moisture sensor reading.
The difference in moisture from the ground to what the plant needs is our error. One more piece of the recipe is the proportional gain, commonly denoted Kp. This is a simple multiplier applied to the system, so we can use the same control system on a thirstier plant like cucumber with a Kp of 2 (meaning we double the water output) or a cactus with a Kp of 0.5 (halving it).

Proportional control feedback loop, sensor → error → output
Control systems are popular because they deal with changes in circumstance and automate a lot of the work managing this garden. Did it rain last night? The moisture sensor reports plenty of water in the soil and the sprinkler system limits or turns off output. Hot day? The sensor reports drier ground and the sprinklers stay on longer. All scaled for different plants via Kp values.
Fewer people are required to manage a larger garden when a control system handles these adjustments. It’s this versatility that lets us use proportional control in many applications, from garden beds to Micromelon Rovers, for example, varying speed based on sensor inputs.
Recap of Control System Components
- Goal: the target.
- Inputs: the information the control loop is given (e.g. soil moisture, car speed, plane altitude).
- Output: the result of the changes your control system made; the thing you’re trying to bring close to the goal (e.g. sprinkler on-time, more gas, more throttle).
- Error: a measure of how far the system currently is from the goal.
- Gain: usually a value denoted
K, or in proportional controlKp. Scales how drastically the system reacts to error.
Control System Elements
A classical example of a control system is the cruise control in a car. Let’s map the previous terminology to cruise control.
Goal
In cruise control, your goal is for the car to remain at the speed you specified. Let’s set the goal to 80 km/h.
However, many things will disrupt this speed: friction, changing air resistance, etc. There’s too much going on to easily model the car using only physics.
Error
If the car drops to 75 km/h due to those effects, the control system calculates an error based on its inputs (in this case the speedometer reading). It computes 80 − 75 = 5 km/h of error, and its goal becomes to make this error as small as possible. The obvious answer is to accelerate the car, but how much?
Gain (Kp)
Gain defines how drastically the system responds to the error. A Kp that’s too high makes the cruise controller add an unreasonable amount of gas, we’ll likely overshoot 80 km/h, then need to brake hard, oscillating around the goal. A Kp that’s too low won’t add enough gas, and we may only reach 77 km/h because the system can’t make a big enough correction.
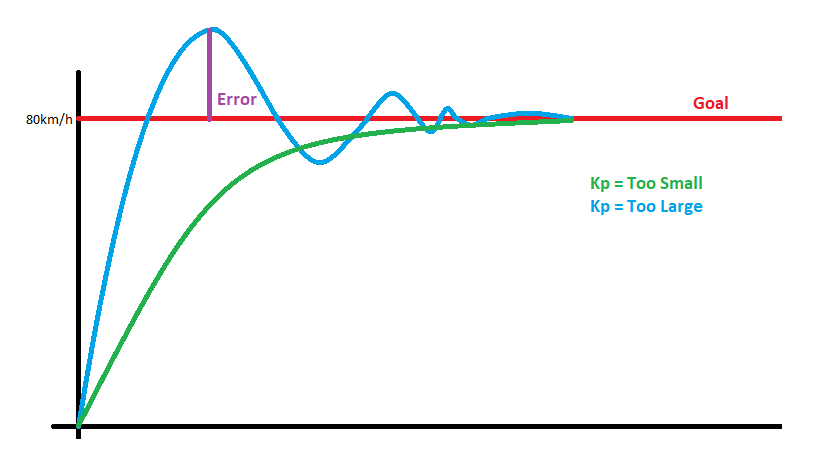
System response, high Kp (oscillating) vs low Kp (slow to converge)
Proportional Control Applications With a Micromelon Rover
You can control almost any action the Rover does based on any of the available inputs, vary the speed of the Rover’s wheels based on its colour sensors, ultrasonic sensor, gyro, etc. You can even combine multiple inputs and have them control one or multiple outputs.
Let’s start with a simple example: changing speed based on ultrasonic distance.
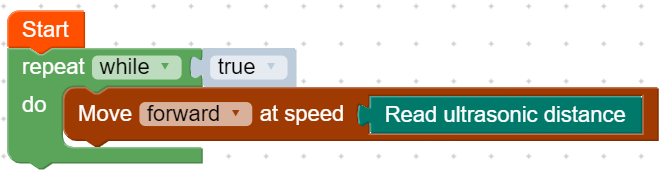
Simple proportional control example, set motor speed to ultrasonic distance
This very small snippet of code essentially behaves like a proportional controller, and is likely the simplest you can make.
- Input: the ultrasonic sensor distance.
- Output: the Rover’s wheel speed.
- Goal: match the Rover’s speed to the live ultrasonic sensor distance.
- Error: less obvious. If the Rover is 10 cm away from a wall and moves straight towards it at 10 cm/s, after 0.1 s the ultrasonic distance reads 9. We were moving at 10 cm/s; the input now tells us the new distance is 9; the system adjusts instantly by setting motor speed to the ultrasonic distance.
- Kp: this program effectively has Kp = 1 because we’re not scaling speed based on distance. To move at half the speed of our ultrasonic reading, multiply the input by 0.5, that’s a Kp of 0.5.
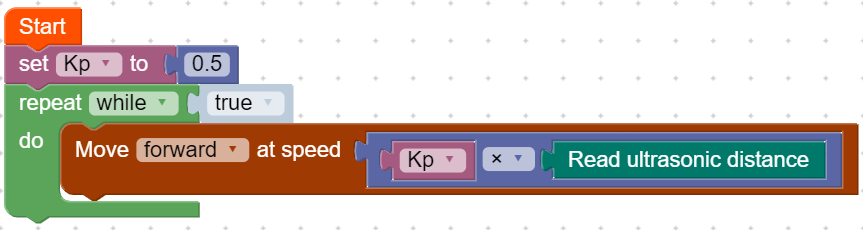
Implementation with Kp = 0.5, motor speed = 0.5 × ultrasonic
(We’ve also changed our goal along with the Kp value, the goal is now to move at half the sensor distance.)
Proportional control example with explicit goal and gain
This is simplistic and not very intelligent. Let’s now generalise the program so we can change the goal and stop a certain distance away from it. The Code Editor has a code example of a PID controller in the advanced section, which is a much more complex version of a proportional controller.
The proportional version doesn’t control the Rover as smoothly as the PID example, but it’s a nice demonstration of the concepts. Proportional control dictates how much speed is required, while the integral (I) and derivative (D) terms prevent the system from overreacting to error spikes or overshooting the goal.
This example also shows defensive programming, accounting for situations where controller values may go far outside what we need. It’s good practice to think critically about ways your system could spiral out of control.
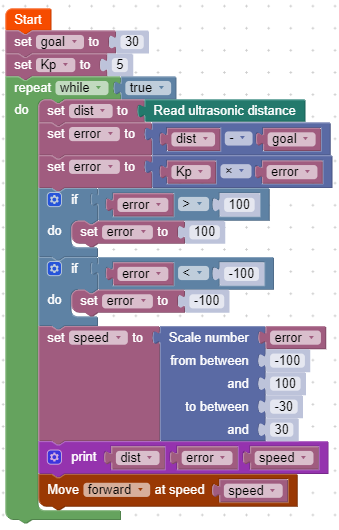
Let’s Break It Down

Defining the goal distance and Kp gain
In these first two blocks we define how far away from objects we’d like to stop, and our Kp gain. Experiment with different Kp values and observe what happens (e.g. 0.1 and 10).
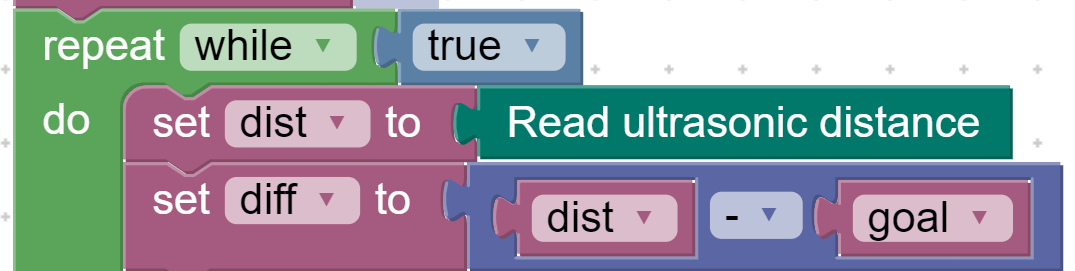
Reading the sensor and computing the error
Set up an infinite While True loop so the code runs until stopped. The first thing inside the loop is to read sensor data and store it as the distance reading dist. From this, we calculate the error by subtracting our goal, if our goal is 10 cm and the sensor says 23 cm, dist = 23 and error = 23 − 10 = 13.

Defensive programming, clamping the difference value
This is some defensive programming. We want our difference values to fall between 0 and 30, even though the ultrasonic sensor can produce values from 0–255. This makes sure values don’t spiral out of control and the Rover doesn’t try to move at 100 cm/s.

Setting motor speed from the error
This is where we adjust the speed using our error between goal and current sensor reading (the 13 value from before).
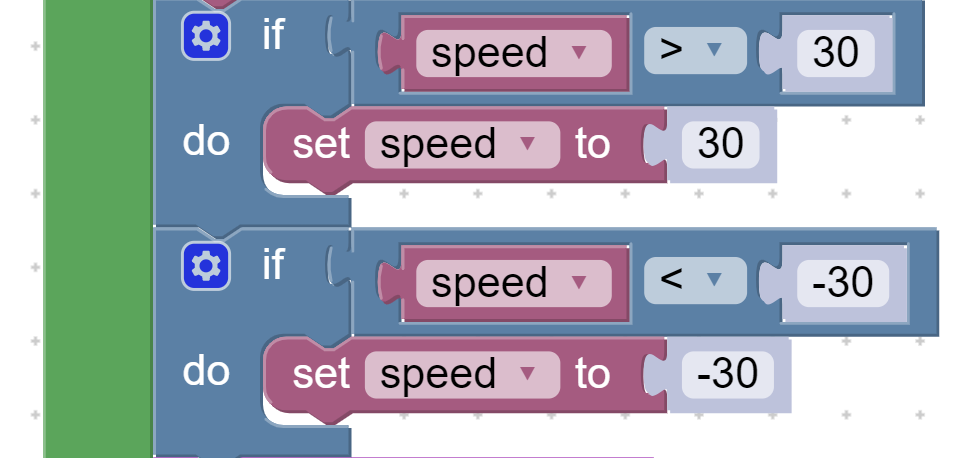
Clamping motor speed to the Rover’s top speed
If a high Kp pushes the speed value far above 30 or below −30, that’s above the Rover’s top speed. We restrict the values manually as defensive programming.
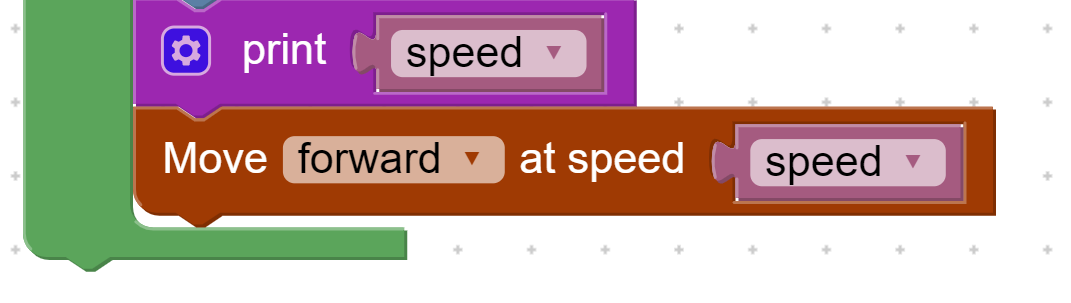
Printing the speed and driving the motors
Finally, we print the speed so we can see it in the console, and tell the Rover to move at the calculated speed.
Limitations of Proportional Control
Proportional controllers are only the beginning, they’re simple compared to many other types of controllers. Some control problems can’t be solved by proportional control, and most are more effective with more intelligent controllers. A car’s cruise control or a plane’s autopilot will have much more complex systems in place.
Proportional controllers tend to overshoot their goal. Unless you’re okay reaching the goal slowly, a proportional controller can only do so much, it’s a system that gets you to your destination, but is bad at slowing down before getting there.
They also don’t deal well with imperfect data or inaccurate sensor readings. The point of a PID controller is that the integral and derivative terms dampen and smooth errors so the system doesn’t overreact, and average out inaccuracies so it gets closer to the goal.
For more precise applications you can encounter persistent error: the error decreases slightly over time but has a hard time getting close to zero. As foreshadowed by the cruise control example reaching only 77 km/h instead of 80: a controller with a low gain may not apply enough extra gas at 77 km/h for the car to speed up. A persistent error of 3 km/h might be okay in some situations, but with a better controller you could stay near 80 km/h.
Exercises Using Proportional Control
Many of our activities can be done without proportional control, but a few benefit from it as a more reliable and dynamic solution.
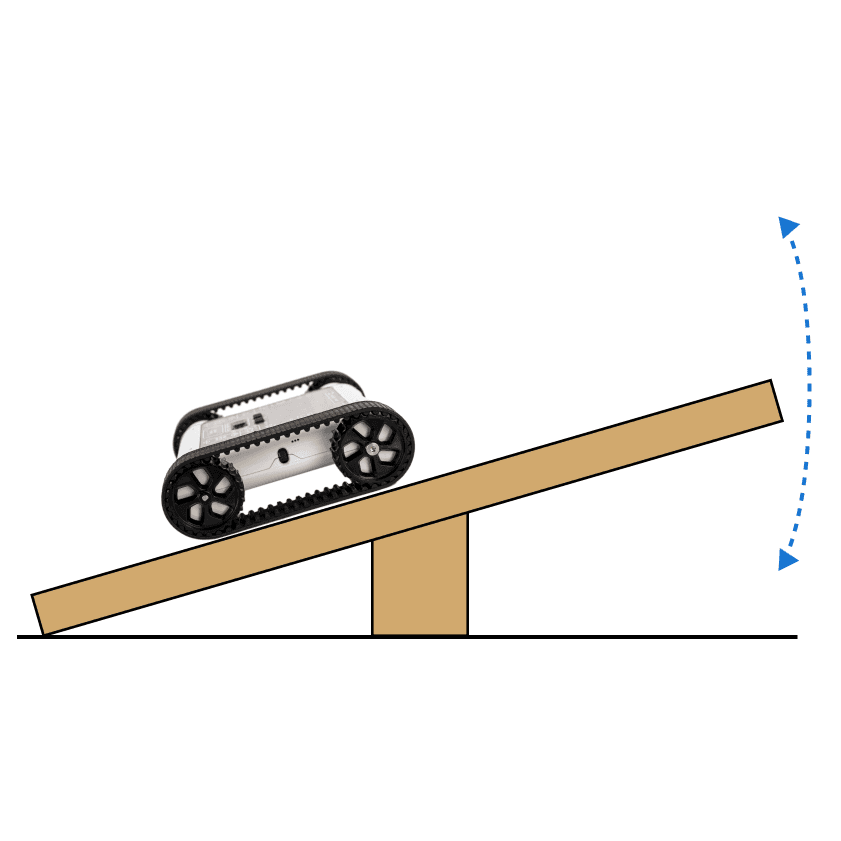
Balance Bot
Use a proportional controller to balance on a see-saw. Your input is the accelerometer, your goal is to have 1g going downwards, and your error to minimise is the difference between your accelerometer reading and 1g.
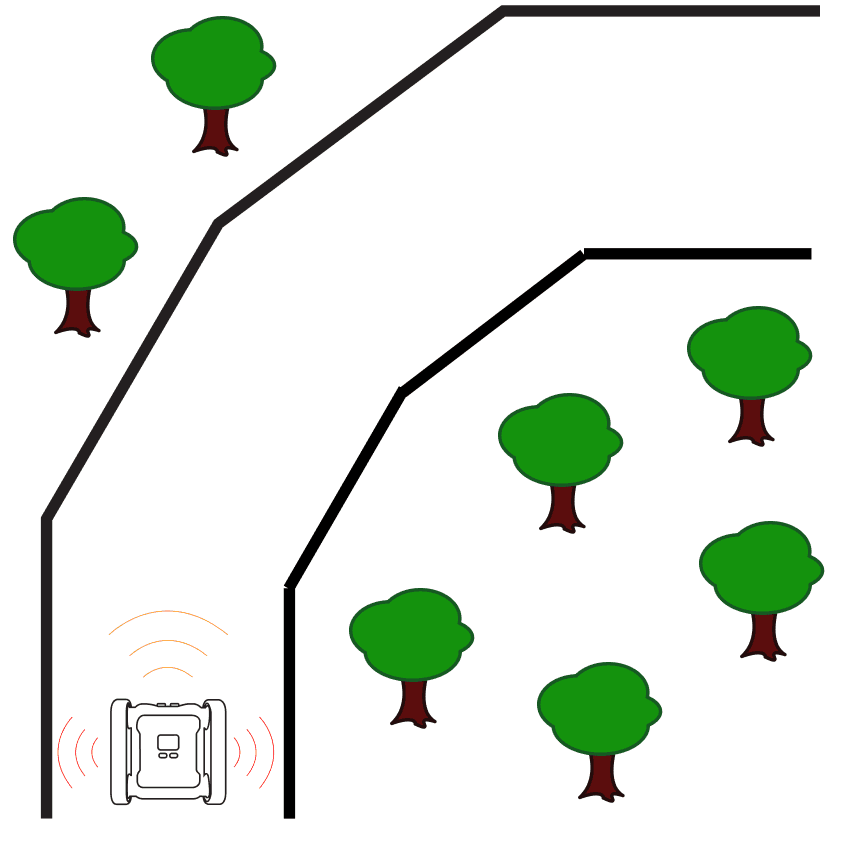
Driving School
The black road in the Driving School simulator activity is actually a slight gradient, the middle of the road is the darkest, and the outside of the road is lighter. Use proportional control on the colour sensors to stay perfectly in the middle of the road. Inputs: left and right colour sensors. Goal: make the two sensor values equal. Error: the difference between left and right brightness.
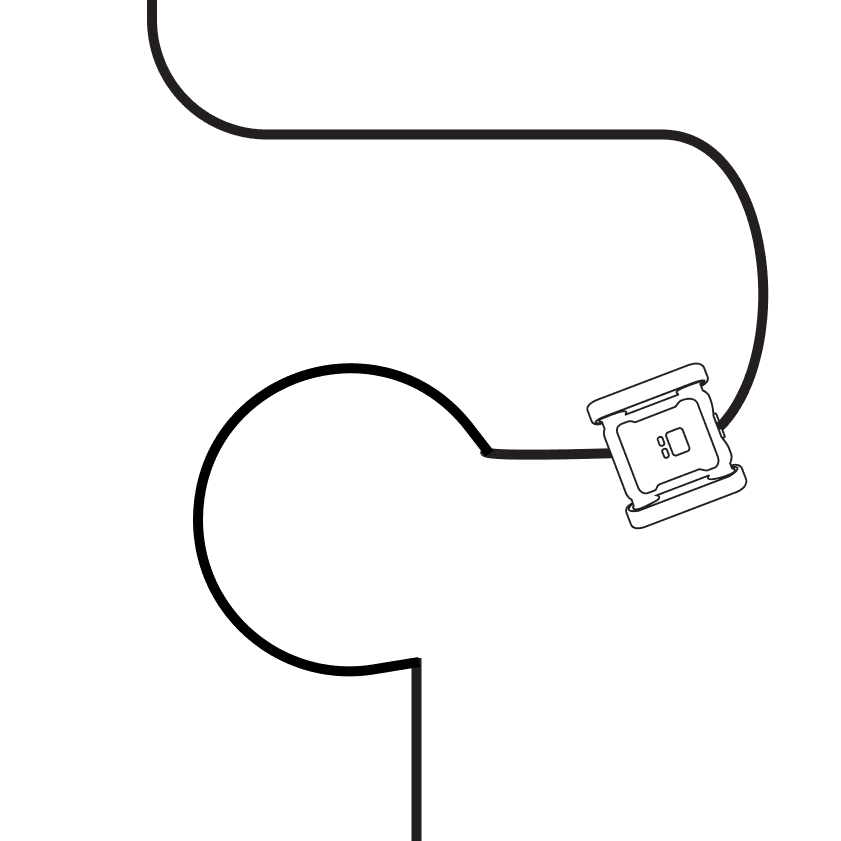
Line Following
When a Rover moves over a line, often only part of the sensor covers the black line and part is still on white, the sensor outputs are more of a gradient than a clear-cut threshold. Use proportional control on this gradient to make line following much smoother. Inputs: colour sensors. Error: the difference between the left and right sensor (where the line is). Goal: minimise that difference.