This post describes how to set up your school. When your school is fully set up, staff and students using Micromelon will have a Micromelon account associated with your school. This enables the classroom management features in the Code Editor.
Classroom Management Features
- Disabling student Rovers
- Muting student Rovers
- Hiding student screens
- Sharing your screen
- Locking what students can see
- Opening and sending students’ work
If you’ve already set up your school and are looking for more information about what the teaching tools do, see the guide below.
Concepts To Understand Before We Start
What is a Micromelon Account?
Micromelon accounts are created through the Code Editor. A Micromelon account is needed to log into the Code Editor. You can create one with a username, email and password, or via Google, Apple, or Microsoft sign-in. All code you write while logged in is saved to your account.
Account Types
When a new account is created it is a home account. Home accounts are not associated with any school. Through the tools described below, you can invite home accounts to join your school as student accounts, teacher accounts, or instructor accounts. Regardless of account type, your account remains yours, your login details don’t change and all your code is preserved if you transition between types.
Student accounts
- No control over school data.
- Cannot add or remove users from a school.
- Cannot use any classroom management features.
Teacher accounts
- Complete control over adding and removing students and classes.
- Can use classroom management features for all classes in the school.
Instructor accounts
- No control over adding or removing students or classes.
- Can use classroom management features only for classes they are assigned to.
What are Classes?
Classes are collections of student accounts created by teachers. When a teacher or instructor applies a class control to a class, all students in that class are affected. Students can be members of multiple classes.
How School Invitations Work
Invitations to join a school are sent via email. Both student and teacher invitations follow these rules:
- When the invited email is associated with an existing Micromelon account, the email contains instructions to accept or reject the invitation.
- When the invited email isn’t associated with an account, the email contains instructions to create one. Once an account has been created, a follow-up email is sent with the accept/reject instructions.
How Many Accounts Can Be Invited?
When you purchase a Micromelon school package, you purchase a number of student licences. Each student account consumes one student licence, 50 licences = 50 concurrent student accounts. You can always remove students from your school to make room for new ones; removed accounts transition back to home users with all data preserved and can be re-added at any time.
Schools that have purchased a site-wide licence have unlimited student licences.
All schools can have unlimited teacher and instructor accounts.
Getting Started
Download and Open the Code Editor
The Code Editor is the primary piece of software used to control Rovers and your school. If you haven’t already, download the Code Editor.
The School Admin
The school admin is the first teacher account in your school.
- If you are the school admin, you should have received your admin account details from the Micromelon team. Once you have those, move to the next steps.
- If your school has purchased Micromelon and you don’t have an account, contact your school admin and they can invite you to join.
- If your school has purchased Micromelon and you’re unsure who the school admin is, Get in TouchSend us a message and we will get back to you within 1 business day. and we’ll help you recover access.
Opening the Teacher Dashboard
Opening the Teacher Dashboard
The Teacher Dashboard is the interface where you control everything related to your school.
After logging in as a teacher, a Manage School button appears in the top left. Press it to open the Teacher Dashboard. If you can’t see this button, your account isn’t yet associated with your school as a teacher, see The School Admin above.
Navigating the Teacher Dashboard
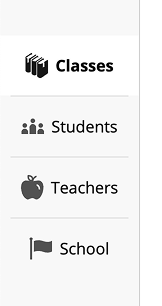
Teacher Dashboard navigation
The left side of the dashboard contains four sections:
- Classes: Create, edit, and use class management tools.
- Students: Invite and remove students from your school.
- Teachers: Invite and remove teachers, control instructor permissions.
- School: Information on your school licence.
Create Classes
The first step in setting up your school is to create the classes you’ll need.
Creating a class
- Navigate to the Classes section of the Teacher Dashboard.
- Press the Create Class button.
- Enter the new class name.
- Press Create.
Once created, the class is opened automatically. You can change which class is open at any time using the class dropdown in the top left.
Onboarding Teachers and Instructors
In this step you onboard the rest of the teaching staff by sending them invitations to join the school. Invitations work the same way as student invitations: existing accounts get an accept/reject link; new emails get instructions to create an account first.
Sending Teacher Invitations
Inviting teachers to a school
- Navigate to the Teachers section of the Teacher Dashboard.
- Press the Invite Teacher button.
- Enter the emails for everyone you want to invite as a teacher.
- Press Confirm.
Invitations are sent immediately. After the invitations are accepted, teaching staff can access your school.
Creating Instructors
Instructors are first invited to your school as teacher accounts. Once they’ve accepted, you can change their role to Casual Instructor and assign them to classes.
Changing a teacher into an instructor
- Navigate to the Teachers dashboard.
- Find the teacher you want to change to an instructor.
- Use the permission dropdown to change their role to Casual Instructor.
- Use Edit Class Access to select which classes they can view.
Onboarding Students
There are several ways to onboard students. The right method depends on whether students already have Micromelon accounts, whether you’ve created classes, and whether you want to set up before lesson time or during a lesson.
Method 1: Quick Join Codes
For this method:
- You have a class created.
- Your students have the Code Editor open and are ready to log in or create an account.
Every class has a unique 9-digit Quick Join Code. Share it with your students and they can use it to join your class and school without an emailed invitation.
Joining a class with a Quick Join Code
- Have your students log in to the Code Editor (or create an account if they don’t have one).
- Open the user menu in the top left and press Join Class.
- Enter the Quick Join Code for your class.
- Press Join Class.
Method 2: Bulk Import Tool
For this method:
- Your students don’t need to have the Code Editor open or have accounts yet.
- You don’t need to have classes created yet.
The bulk import tool lets you invite many emails at once by uploading a spreadsheet. If you don’t have a spreadsheet but want to use the importer, fill in this template. The file you upload is never saved by Micromelon.
Bulk import tool, opening the importer
- Navigate to the Students section of the Teacher Dashboard.
- Press Import Students.
- Select or drag in your file (
.xls,.xlsx, or.csv). - If your file has multiple sheets, pick the sheet to use.
- Select the spreadsheet column to send invitations from.
- Optionally, choose to assign the invited student accounts to classes at the same time.
- Use the toggles on the left of each row to choose which rows to import.
- Press Confirm.
All selected emails are now invited to join your school as students.
Method 3: Manual Student Invitations
For this method:
- Your students don’t need to have the Code Editor open or have accounts yet.
- You don’t need to have classes created yet.
This method lets you send invitations by typing in emails directly.
Manually inviting students
- Navigate to the Students section of the Teacher Dashboard.
- Press Invite Student.
- Enter the emails of the accounts you want to invite. You can invite multiple at once.
- Press Confirm.
All entered emails are now invited to join your school as students.
Moving Students In and Out of Classes
Class controls apply to every student in a class. Whether students are already in a class depends on the onboarding method you used. Teachers can add or remove students from classes at any time.
Adding Students To A Class
There are two ways to add students to a class:
- Use the class Quick Join Code (covered in Method 1 above), does not require students to be members of your school first.
- Manually add student accounts that have already accepted an invitation.
To add students manually:
Adding students to a class manually
- Ensure the students are members of your school via invitation or Quick Join Code.
- Navigate to the Classes section of the Teacher Dashboard.
- Select the class you want to add students to from the class dropdown.
- Press the Add Member button.
- Select all the students you wish to add.
- Press Confirm.
Important: Recently invited students won’t appear in this list until they’ve accepted the invitation.
Removing Students From A Class
Removing students from a class
- Navigate to the Classes section of the Teacher Dashboard.
- Select the class you want to remove students from.
- Select all the students you wish to remove.
- Press the Remove Member button.
- Press Confirm.
The selected students will no longer be members of this class. If you also chose to remove them from your school, they’ll be removed from the school as well.
All Done
Your school should now be ready to go. If you’re still unsure how to set up your school, please don’t hesitate to Contact Us.
Get in TouchSend us a message and we will get back to you within 1 business day.